Follow me on Instagram, Facebook, and Pinterest for more creative inspiration!
This post contains affiliate links.
I get asked about our DIY sliding barn door in our kitchen almost every time that I post a kitchen picture on Instagram. I wasn’t going to write up a post about this door, but it seems like everyone would like to see how we made it!

Here’s what we started with in our kitchen. We had a weird space that used to house the hearth for the home (way back in the day). We figured it could be a perfect little pantry. But instead of building a door, we realized this space would work well with a sliding barn door.
We added some more drywall to the left side. When you’re planning out a sliding barn door installation, you need to make sure that it’s going to have enough room to slide all the way to the left and have the doorway be opened. So we needed to add a little bit of wall space to the left hand side so the door would fit.

What you’ll need for this project:
- Hollow core door
- Wood
- Saw (or get it cut at the hardware store)
- Adhesive
- Nails
- Caulk
- Wood filler
- Primer (this is the only one I’ll ever use)
- Paint
- Paintbrush
- Barn door hardware
I went to ReStore and found an old hollow core door that fit the space. It was thinner and it was the right length – perfect! It was also $10, so that was even better.
We then measured out the door, and divided it into four sections. We put wood on the door with nails and adhesive. I believe we used 1×4’s on the sides and the interior boards, and then doubled up those boards on the top and bottom to add some visual weight.

Once the wood was adhered, I sanded, caulked and painted the wood.
We needed our sliding door to clear the molding we had on the floor, so we put a piece of wood on the wall to bring the whole door out a bit.

We did a lot of searching for the best price on barn door hardware, and this was by far the best price we found. It wasn’t the easiest to put together because the directions weren’t detailed, but it was worth the savings. We bought another style of barn door hardware by the same brand for our sliding door in our hallway.
Now, here’s the tricky part, and why I almost didn’t write up this tutorial. The barn door hardware didn’t fit with the width of the extra wood on the door. My husband was not too happy when we figured this out. He ended up figuring out that he could make it work by “gouging” holes in the back of the door so the hardware could connect on either side. Phew. We realized too late that we probably should have used a drill bit like this and it would have been easier.
Once we got it all attached & secured, we mounted the hardware to the wood that was attached to the wall:

I added a handle (from Home Depot…it was silver and I spray painted it matte black).
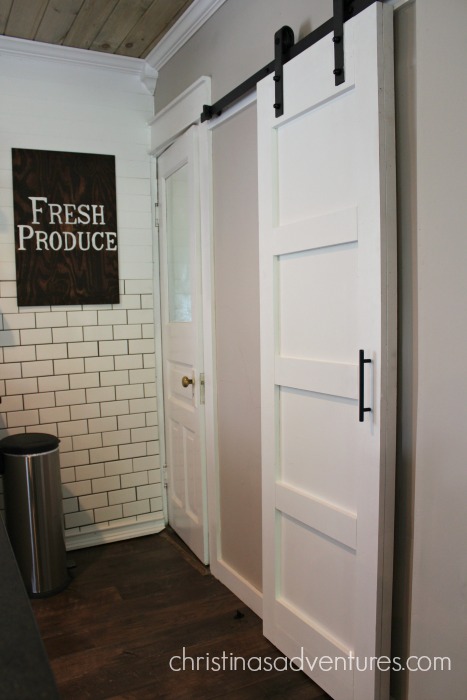
I’m so glad we went with this idea for our pantry door! We love the character it adds to our kitchen:

If you liked this tutorial, pin this image for future reference:

Then make sure you’re signed up for my e-mail newsletter (sign up at the bottom of this post)
See the other DIY projects in our kitchen:
The post DIY Sliding Barn Door appeared first on Christinas Adventures.